In the world within our paintings, we always want to convey the sense that the color of the light source — be it cool, warm, or deeply colored — is consistent with the the colors we see on the subject. This is a kind of “color parallelism”, which is in perfect alignment with the idea that we don’t paint the colors of things, but the color of the light that falls on those things. This is particularly important in landscape painting because the light source — the sky — is very often part of the subject.
Working too closely from a photo, especially if it is under- or over-exposed, can make it nearly impossible to suggest a unifying color-light within the painting. In this demonstration, my goal was to repair an improperly exposed sunset image, and establish a convincing color and value relationship between the sky and ground.
Note: Although I am a big proponent of using photo reference, I believe that directly copying photos is one the biggest mistakes a landscape painter can make. For more information about the problems inherent in using photo reference, see The Tyranny of Photo Reference and Using Photographs Like and Artist.

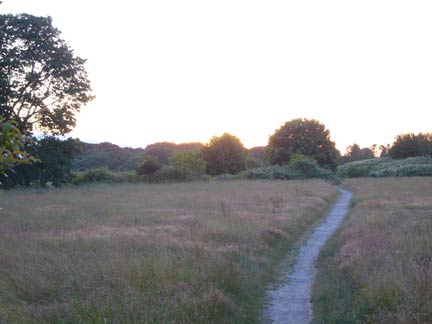
Original photo: The original unaltered photo is overexposed, and appears very washed out. It demonstrates a common photographic problem. When shooting high contrast subjects the camera can only make a single exposure based on how dark or light it reads the subject. The trouble is, the camera is very poor at finding a compromise exposure between darks and lights, as there usually are between the land and the sky, especially at sunset.
When the photo is exposed for the sky, the sky will have lots of saturation and color, but the ground will be very underexposed and goes to black. The opposite happens when the photo is exposed for the ground. The ground is better exposed, but the sky “blows out” to white and loses all of its color, as in this example. When shooting photographic reference, then, the solution is simply to take two photos, one that exposes for the sky and one that exposes for the land. Newer digital cameras, including those in mobile phones, have settings that offer HDR (high dynamic range), which make a compromise exposure between under- and over-expoures. The results are often much, much better. If you only want to take one photo, err on the side of exposing for the sky and letting the land get dark. If the sky blows out to white, it is not recoverable; that is, the color information simply hasn’t been captured in the image. However, there is usually lots of detail hidden in the darks, which can be brought out using the Shadow/Highlight filter in Photoshop or Photoshop Elements. (For instructions, see notes at end of article.)

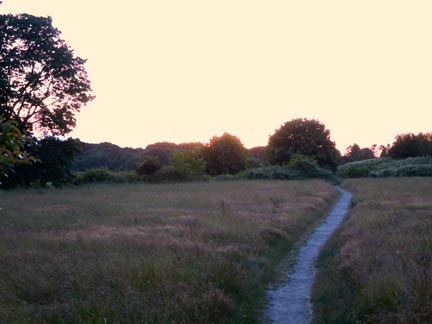
Values adjusted in original. The original image is darkened, which alone is a big improvement. The additional contrast and saturation of the foreground colors, even as muted neutrals, is much more convincing.

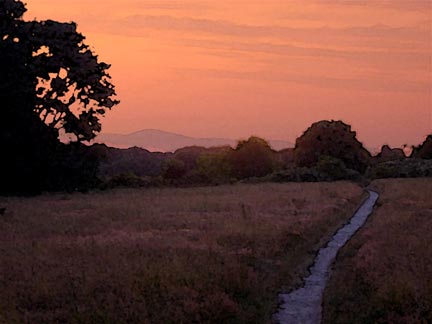
Fully modified photo. 1. I darkened the ground further and gave it considerably more contrast. 2. I also shifted the color of the ground toward red, so if felt like it was picking up some of the color from the sunset sky. 3. I inserted a sunset sky from another well-exposed photo, replacing what was missing in the original. 4. I ran the entire image through a shape filter in Photoshop to give it the appearance of a painting. Steps 2 and 3 were the key to creating a convincing light. Not only are the colors of the sky and land “exposed” properly, but the color of the ground has been modified to feel like it is actually being influenced by the color of the red sunset. The final version may be a far cry from the original, with much of the color “invented;” however, it does demonstrate an important truth about landscape light: there is a direct relationship between the color of the sky and the color of the land. To be convincing, the ground colors must have the appearance of being influenced by a light of a particular color.
Using the Shadow/Highlight filter in Photoshop or Photoshop Elements
Applying the Shadow/Highlight filter lightens the values of the dark shadows, which reveals more color and detail. Similar results can be achieved with Levels, but I find Shadow/Highlight more specific; it seems to target just the darks.
In Photoshop … Image > Adjustments > Shadow/Highlight …
In Elements … Enhance > Adjust Lighting > Shadow/Highlight …
A dialog box with a slider will come up which previews the change to the photo. By default, the amount it uses in “Shadows” is too high. Usually, lowering that amount will give best results, but each photograph is different.
Additional Resources
Landscape Painting: Essential Concepts and Techniques for Plein Air and Studio Practice
Chapter 10: Working with Photographs
The Landscape Painter’s Workbook: Essential Studies in Shape, Composition, and Color
Why Subject Selection Matters, page 37
Using Photographs Like an Artist
Evaluating Photo Reference for a Series
Book Review: What Photographers Can Learn from Landscape Painters

3 Comments
Great photo samples. Very convincing final product! Wish you had a handbook on how to manipulate photos for oil painting.
It seems like 20% of most software does most of what’s needed 80% of the time.
I wanted to share with everyone that Photoshop Elements is now on sale at Costco for $30 off the $80 price = $50! I can’t wait to get it installed and try out all the tricks Mitch suggests.
Mitch, I want to thank you for the time and effort that you put into your excellent book. I am savouring every page and going through the exercises even though I have been painting for longer than I care to/ or can remember. Sometimes going back and revisiting the fundamentals even for a seasoned painter is a healthy endevour. It is even more so when you can do it in the company of a well written and well thoughtout book.